Common Sprinkler & Irrigation Repairs in Florida (And When to Call a Pro)
Summary:

Broken Sprinkler Head Repair
Broken sprinkler heads are probably the most visible problem you’ll face. You’ll know it when you see it—water shooting sideways instead of spraying in a pattern, heads that won’t pop up, or cracked casings leaking water around the base.
They take a beating out there. Lawn mowers, vehicles backing over them, foot traffic, even just years of Florida sun breaking down the plastic. The constant expansion and contraction from temperature changes doesn’t help either. Once a head is damaged, it’s not distributing water where it should, which means some areas get soaked while others stay bone dry.
Replacing a broken head is one of those repairs that looks simple enough—and often is, if everything goes smoothly. Unscrew the old one, screw in the new one, test it. But here’s where it gets tricky: you need the right replacement head that matches your system’s pressure and coverage needs. Use the wrong type and you’ll have mismatched spray patterns that waste water and leave gaps in coverage.
What Causes Sprinkler Heads to Break or Malfunction
Physical damage is the obvious culprit. Run over a head with the mower one too many times and something’s going to give. But that’s not the only way heads fail in Florida.
Clogged nozzles are incredibly common here. Sandy soil, mineral deposits from hard water, bits of grass and debris—all of it can work its way into the nozzle and block the spray. You’ll notice reduced water pressure or uneven distribution. Sometimes the head looks fine but barely puts out any water because the inside is completely gunked up.
Then there’s the settling and tilting issue. Florida’s sandy soil doesn’t always provide stable support, especially in coastal Palm Beach County areas. Heavy landscaping equipment, soil compaction, even just the natural settling of the ground can cause heads to sink or tilt over time. When that happens, the spray pattern gets thrown off. You end up watering your sidewalk instead of your lawn.
UV damage from constant sun exposure degrades the plastic components. The caps crack, the seals wear out, and eventually the whole assembly starts leaking or fails to retract properly. It’s just wear and tear, accelerated by Florida’s intense sunlight and heat.
Age plays a role too. Even quality sprinkler heads have a lifespan. Most last somewhere between 10-20 years depending on the brand and conditions, but once they start showing their age, problems multiply. A head that’s been working fine for 15 years might suddenly develop multiple issues all at once as various components wear out simultaneously.
When to DIY Sprinkler Head Replacement vs Calling for Help
If you can see the problem and it’s clearly just one or two broken heads, DIY might work. You’ll need to identify the exact replacement part—take the old head with you to the store or snap a photo of any markings on it. Make sure you’re getting the same type: pop-up spray head, rotor head, or whatever your system uses. Mixing different types in the same zone creates coverage problems.
The actual replacement process isn’t complicated if you’re handy and the head comes out easily. Dig carefully around the head to expose the riser, unscrew the old head counterclockwise, check that the riser itself isn’t damaged, and screw on the new head. The key word there is “carefully”—you don’t want to crack the riser or get dirt into the line. Even a little bit of sand or soil pushed into your system can travel through the pipes and clog filters or other heads down the line.
Here’s where professional help makes sense: if you’re dealing with multiple broken heads across different zones, that might indicate a bigger pressure issue. If the head is stuck and won’t unscrew, forcing it can crack the riser or the pipe below, turning a simple fix into an excavation project. If you pull the head and water comes gushing out under high pressure, you’ve got a valve that’s not closing properly—that’s a different problem entirely.
Also consider the time factor. What looks like a 30-minute job can easily turn into half a day if you hit complications. Tree roots growing around the pipe. Risers that snap off when you try to remove them. Discovering the previous owner used non-standard parts that don’t match anything at the hardware store. We’ve dealt with all of these scenarios and have the right tools and parts on the truck.
The cost difference isn’t as dramatic as you might think. A sprinkler head itself costs $5-$20. But if you break something during the DIY attempt, you’re looking at additional parts, more time, and potentially calling a pro anyway to fix what went wrong. Professional replacement typically runs $60-$150 per head including labor, and we’ll spot other issues while we’re there—like heads that aren’t broken yet but are about to fail, or coverage gaps you didn’t notice.

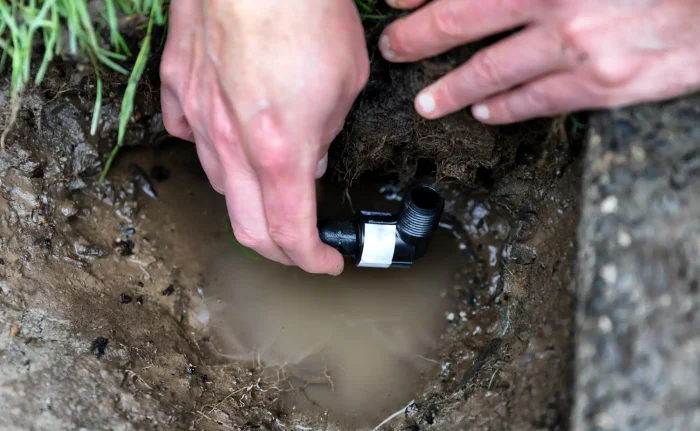
Leaking Sprinkler System and Irrigation Valve Repair
Leaks are sneaky. Sometimes you’ll see obvious pooling or soggy spots in your yard. Other times, the only clue is a water bill that’s doubled for no apparent reason. Either way, you’re losing water and potentially damaging your landscape in the process.
Valve problems are often the source. Every zone in your irrigation system has a valve that controls water flow to that section. When valves fail, they either won’t open (meaning that zone doesn’t water) or won’t close (meaning water continuously leaks into that zone even when the system is off). In Florida’s humid climate, constantly wet areas become breeding grounds for fungus, mosquitoes, and other problems you don’t want in your yard.
Underground pipe leaks are harder to detect but just as problematic. You might notice areas of grass that are unusually green and lush compared to the rest of your lawn—that’s often a sign of a slow leak feeding extra water to that spot. Or you might see sunken areas, bubbling water when the system runs, or even small sinkholes forming as water erodes the soil beneath.
How to Tell If You Have an Irrigation Valve Leak
Start by checking if water is running when it shouldn’t be. Turn your controller completely off—not just to the “off” position in the program, but actually disconnect it or flip the breaker. Then go check your zones. If you see water still trickling or spraying from heads, you’ve got a valve that’s stuck open.
Low head drainage can look like a leak but isn’t actually a problem. After your system shuts off, water that’s sitting in the pipes will drain out through the lowest sprinkler head in that zone. It’ll run for a few minutes then stop once the pipes are empty. That’s normal. A true valve leak continues indefinitely—you could come back hours later and water would still be flowing.
Check your water meter. Turn off all water use inside and outside your home. Look at the meter—if that little dial is moving, water is flowing somewhere. If it’s not moving, you might have low head drainage or a zone that only leaks when the system is actively running.
Unusual wet spots in your yard are another telltale sign. If you’ve got an area that stays soggy days after rain, or grass that’s growing faster and greener than the surrounding area without any obvious reason, there’s probably a leak feeding water to that location. In Palm Beach County’s sandy soil, you might also notice the ground feeling soft or spongy, almost like walking on a waterbed.
Valve boxes themselves can give you clues. Locate your valve boxes (those green or black plastic covers in your yard) and pop them open. If there’s standing water inside the box when the system hasn’t run recently, that’s a problem. The valves might be leaking, or you could have a crack in the box allowing water to seep in from a leak elsewhere.
Listen for unusual sounds. A valve that’s partially stuck might create a humming, buzzing, or chattering noise when the system is running. That’s the valve trying to open or close but not completing the action smoothly. It’s a sign that debris is caught inside or the diaphragm is damaged.
Common Causes of Valve Failure and When Professional Repair is Necessary
Debris is the number one reason valves fail. A tiny grain of sand, a small twig, even a snail can get lodged in the valve mechanism and prevent it from sealing properly. When that happens, water continues to flow past the valve even when it should be shut. Sometimes you can fix this by opening the valve, manually flushing it out, and reassembling it. Other times, the debris has scratched or damaged the valve seat, and cleaning won’t solve the problem.
Worn diaphragms are another frequent issue. Inside each valve is a rubber diaphragm that flexes to control water flow. Over time, that rubber deteriorates—especially in Florida’s heat and with constant exposure to minerals in the water. A torn or cracked diaphragm can’t create a proper seal, so the valve leaks. Replacing the diaphragm is possible if you know what you’re doing, but it requires disassembling the valve, having the correct replacement part, and reassembling everything without getting dirt into the system.
Failed solenoids cause valves to malfunction electrically. The solenoid is the component that receives the electrical signal from your controller and tells the valve to open or close. If the solenoid fails, the valve won’t respond to commands. You might find that a zone won’t turn on at all, or it turns on but won’t shut off. Testing a solenoid requires a multimeter and understanding of electrical systems—not exactly beginner territory.
Broken O-rings and seals are small problems that create big headaches. These rubber components create watertight connections between valve parts. When they crack or deteriorate, water leaks out around the connections. Sometimes you’ll see water weeping from the valve box itself. Replacing O-rings is technically straightforward if you can identify the correct size and type, but if you install the wrong one or don’t seat it properly, the leak continues.
Here’s when you absolutely need professional irrigation valve repair: if you’ve cleaned the valve and it still leaks, the problem is internal damage that requires replacement parts or a new valve. If you’re not comfortable working with your system’s electrical components, don’t mess with solenoid testing or replacement—a mistake there can damage your controller. If the valve is buried or in a difficult-to-access location, we have the tools and experience to work in tight spaces without causing additional damage.
Underground pipe leaks connected to valve issues are particularly tricky. Sometimes what looks like a valve problem is actually a cracked pipe near the valve, or a fitting that’s come loose. Diagnosing this requires pressure testing and possibly excavation. Getting it wrong means digging in the wrong spot, wasting time and money, and potentially damaging other parts of your system or landscape.
The cost of professional valve repair typically runs $75-$300 depending on whether you need cleaning, parts replacement, or a complete valve replacement. Compare that to the water waste from a leaking valve—even a small leak can waste over 6,000 gallons per month. That’s not just an environmental issue; it’s money literally pouring into your lawn every month until you fix it.

Sprinkler Controller Repair and Timer Malfunctions
Your controller is the brain of your irrigation system. When it stops working properly, your entire watering schedule falls apart. Maybe zones aren’t running when they should. Maybe they’re running at the wrong times, or not shutting off. Controller problems can be frustrating because they’re not always obvious—the box might look fine, but something’s malfunctioning internally.
Common controller issues include power problems (the display is blank or flickering), programming glitches (settings that won’t save or randomly reset), and zone failures (one or more zones won’t activate). Sometimes it’s as simple as a tripped breaker or dead backup battery. Other times, it’s a fried circuit board or failed transformer that requires replacement.
In Palm Beach County, power surges from afternoon thunderstorms are a frequent culprit. Lightning doesn’t have to strike your property directly—a nearby strike can send a surge through the electrical lines that damages sensitive electronics like irrigation controllers. That’s why many systems benefit from surge protectors, though most older controllers don’t have them installed.